


This article contains instructions for inspecting and adjusting your lights for model year 2020 and newer Slingshot models. Refer to the Headlamp Adjustment and Maintenance article for all other models.
The following headlamp aim inspections and adjustments will be accurate only when tire pressures and suspensions are at factory-recommended settings. Refer to safety labels on the vehicle or to the Specifications chapter of your Owner's Manual. The vehicle must also be unladen — without fuel, rider weight or cargo weight.
LED lights are not serviceable. If one of the LED lamps fails to illuminate, see an authorized dealer for replacement of the assembly.
Center Headlamp Aim Adjustment
1. Verify that headlamp aim inspection conditions are met.
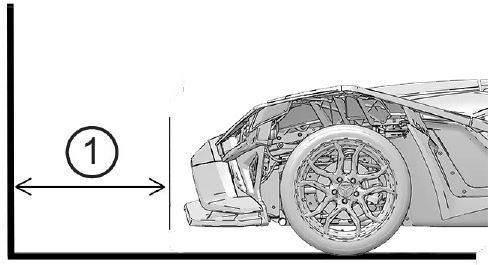
2. Position the vehicle on a level surface with the nose approximately 9 feet (2.7m) (1) from a wall.
3. Press the Engine Start button twice to enter Accessory Mode, and then pull the turn signal lever rearward (as if to activate the high beams). Important: If the engine was last powered off with the high beams still on, pulling the turn signal lever in Accessory Mode will reactivate the high beams. Verify that the LOW BEAM lights, not high beams, are activated to perform the headlamp aim adjustment.
4. Observe the headlamp beam display on the wall. The beam displays at two levels: higher on the right side and lower on the left side. Measure from the floor to the top of the cutoff for the lower beam display at the left side. When the beam is properly adjusted, this measurement should be:
- 22.5 inches (57 cm) for U.S. models
- 21.5 inches (54.6 cm) for Canadian models
5. To adjust a headlight beam, open the hood and turn the two upper headlamp adjustment screws simultaneously and equally. Turning the adjustment screws in tandem keeps the beam pointed straight, not skewed left or right.
- Turning clockwise raises the beam.
- Turning counter-clockwise lowers the beam.
Headlamp Bulb Replacement (Canada Only)
When servicing a halogen lamp (bulb), avoid touching the lamp with bare fingers. Oil from your skin leaves a residue, causing a hot spot that will shorten the life of the lamp. If your fingers do touch a lamp, clean it with denatured alcohol.
1. Pull the sealing boot away from the back of the bulbs and housing.
2. Press the looped end of the wire bulb retainer clip and swing the end toward the center of the bulb to release it from the latch tab.
3. With the wire connector attached, pull the bult out.
4. Disconnect the wire harness. Install the new bulb and secure the retainer.
5. Reinstall the sealing boot. Make sure it seals tightly around the bulb base and lens to seal off from moisture.
For more information, see your authorized Slingshot Dealer. Find a dealer near you with the Dealer Locator.
Maintenance tips, procedures and specifications can be found in your Owner's Manual.
To find diagrams and replacement part numbers, use the online parts catalog.
Unless noted, trademarks are the property of Polaris Industries Inc.
© 2022 Polaris Inc.


