


Before updating your display, we recommend syncing your rides and places. To do this, either log in to your Slingshot account on your display or pair your display with the Slingshot App. If you are unable to sync with RIDE COMMAND, we recommend saving your rides and places to a USB drive.
If you have an active RIDE COMMAND+ subscription, you may be able to update the software on your display via an Over the Air (OTA) update. When an update is available, tap the banner that prompts you to update, and the new software will install. Map updates are not available via OTA update. To learn more, read RIDE COMMAND+ for Slingshot.
Updating Slingshot Software
On your computer:
1. Go to the Slingshot RIDE COMMAND website. Scroll to the bottom of the page and click UDPATE VEHICLE SOFTWARE.

2. Use the links on the left-hand side of the page to navigate to software updates. Under the INSTALL USING USB FLASH DRIVE dropdown menu click on DOWNLOAD UPDATE. A wired internet connection is recommended, if available.
3. Save the update file to a removable USB drive (file cannot be in a folder). The downloaded file does not need to be opened on the computer. A USB drive 1GB or larger is required formatted to FAT32.
On your Slingshot:
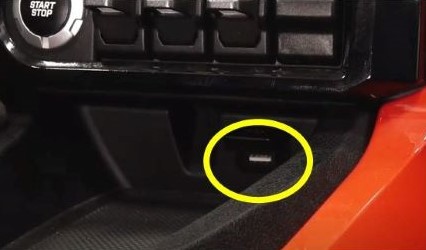
1. Plug the USB drive into your vehicle's USB port and turn on the display. The USB port is below the 7" Display powered by RIDE COMMAND. Connect the vehicle to a trickle charger.
2. Press the Slingshot logo at the top of the screen and then press SETTINGS.

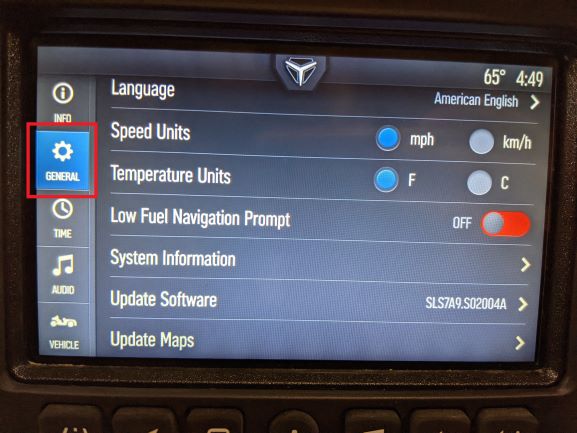
3. Press GENERAL from the tabs on the left.
4. Scroll down to UPDATE SOFTWARE.
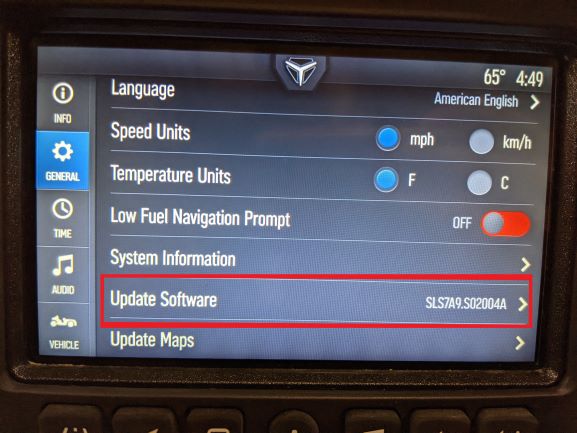
5. Select the file you want to install. "Newest" will be automatically displayed next to the newest version detected on the USB drive.
6. The display will reboot and install the software. This may take a few minutes to complete.
It is recommended that you update your maps after updating the software.
Updating Slingshot Maps
1. Log in to your Polaris Slingshot account. Ensure that the vehicle is in your Garage. If not, read How to Add a Vehicle to Your Garage for help.
2. Follow the instructions on the Slingshot RIDE COMMAND website to copy the map package onto a USB flash drive. The USB should be 32GB and formatted to either FAT32 or exFAT®.
3. Connect your Slingshot to a trickle charger before starting the maps update and disable Automatic Display Power Down. To do this, go to SETTINGS > VEHICLE > AUTOMATIC DISPLAY POWER DOWN. Note: If the display powers down while attempting to update maps or software, you have to restart the update process on the Slingshot. This setting will revert to default when you turn the vehicle off.
4. Plug the flash drive into the USB port on the Slingshot. The USB port is below the 7" Display powered by RIDE COMMAND.
5. Press the Slingshot logo at the top of the screen and then press SETTINGS.
6. Press GENERAL from the tabs on the left.
7. Scroll down to UPDATE MAPS.
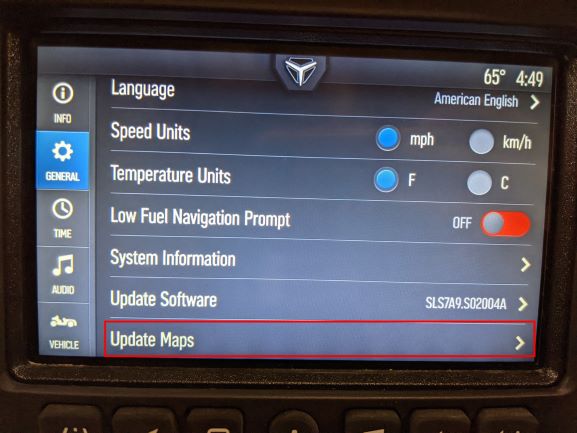
8. Tap on the map file that you'd like to update the display with. Wait for the update.
9. After the map has been updated, the display will reboot and show the maps on the navigation screen. Make sure that the USB is not ejected before the map update has been completed and that the unit has rebooted on its own.
If for some reason the map update was not successful or completed, and the maps are displayed as blank, try updating the map package again.
More information can be found on the Slingshot RIDE COMMAND website.
For assistance, see your authorized Slingshot Dealer. Find a dealer near you with the Dealer Locator.
Maintenance tips, procedures and specifications can be found in your Owner's Manual.
To find diagrams and replacement part numbers, use the online parts catalog.
exFAT® is a registered trademark of Microsoft Corporation
Unless noted, trademarks are the property of Polaris Industries Inc.
© 2024 Polaris Industries Inc.


