


The instrument cluster on your model year 2020 and newer Slingshot includes: the speedometer (1), tachometer (2), indicator lamps (3), mode button (4), toggle buttons (5) and the Rider Information Center (6).
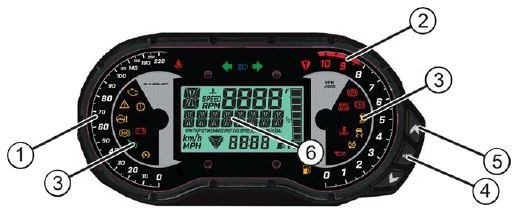
To verify proper function of the indicators in the instrument cluster, activate the electrical system with the engine start/stop button. All indicators shown in the above image will briefly turn on.
The speedometer displays vehicle speed in either miles per hour (mph) or kilometers per hour (km/h). See the Display Units section below for instructions on how to choose which unit of measurement is shown.
The tachometer displays engine speed in revolutions per minute (RPM). A red line on the face of the gauge indicates the maximum safe engine speed. Excessive engine speed can cause engine damage or failure, which could result in serious injury or death. Do not allow engine speed to exceed the red line.
Press and hold the mode button to enter or exit the settings menu. Press and release the mode button to cycle through Area 1 modes and to select an item.
Press and release either toggle button to cycle through the options menu or Area 2 modes. Press and hold either toggle button to reset an item.
With the ignition off, pressing the mode button or either toggle button will power up the Rider Information Center for 10 seconds to allow viewing of the odometer and the clock.
Indicator Lamps
| Lamp | Indicates | Condition |
 | Cruise Control Enabled | Before using the cruise control, read the safety and operation procedures found in your Owner's Manual. |
 | Cruise Control Engaged | Before using the cruise control, read the safety and operation procedures found in your Owner's Manual. |
 | Anti-Lock Brake System | Your dealer can assist if this lamp remains on. When the lamp is illuminated, the anti-lock brakes will not activate, but the conventional brake system will continue to operate normally. |
 | High Beam | This lamp illuminates when the headlamp switch is set to high beam. |
 | Turn Signal / Hazard Lights | |
| The turn signals are located at the top center of the instrument cluster. Arrows flash when either a turn signal or the hazard signal is activated. If a lamp fails or if there is a short circuit in the signal system, the lamp flashes at more than twice the normal rate. | ||
 | Low Fuel | This lamp illuminates when approximately 1 gallon (3.8 liters) of fuel remains in the fuel tank. |
 | Hot Engine | This lamp illuminates to indicate an overheated engine. If the indicator flashes, the overheating condition remains, and the system will automatically reduce engine power. |
 | Check Engine | If this lamp illuminates while the engine is running, promptly contact an authorized dealer or another qualified person who can assist with diagnosis. If abnormal engine operation is detected, the light will remain on as long as the fault condition exists. Retrieve the error codes for diagnosis. See below for directions. This lamp is also known as a malfunction indicator lamp (MIL). |
 | Low Battery Voltage | This lamp illuminates when battery voltage is low or when voltage is above the normal range. Turn non-essential accessories off to conserve power. Make sure the charging system is operating properly. |
 | Traction Control | This lamp illuminates if the user disables traction control with the ESP Switch. |
 | ESP Disabled | This lamp illuminates if the user disables the ESP with the ESP Switch. Always enable to ESP for normal operation. |
 | ESP Intervention | The ESP intervention lamp flashes when the ESP is actively assisting. The lamp illuminates solid to indicate a system fault and the ESP will be disabled. If the lamp illuminates solid, your dealer can inspect the vehicle and perform service. |
 | Brake Failure | This lamp illuminates if a brake component is not operating properly. Do not operate the vehicle. Inspect brake fluid levels. Your dealer can inspect the vehicle and perform service. |
 | Seat Belt | The seat belt lamp illuminates whenever the vehicle is in ignition state and the driver's seat is not fastened. |
 | Pinion-Assisted Electric Power Steering Warning | This lamp illuminates briefly when the vehicle is in ignition state. If ignition state is activated for 5 minutes without starting the engine, the lamp illuminates to indicate that the PEPS has shut down to conserve battery power. If the lamp illuminates after starting the engine, the power steering system is inoperative. Your dealer can inspect the vehicle and perform service if the lamp illuminates after starting the engine. |
 | Park Brake Engaged | This lamp illuminates when the park brake is engaged. If it illuminates when the park brake is NOT engaged, your dealer can inspect the vehicle and perform service. |
 | Low Oil Pressure | This lamp illuminates if the engine oil pressure drops below safe operating pressure. If this lamp illuminates while the engine is running, turn the engine off as soon as safely possible and check the oil level. If the oil level is correct and the lamp remains on after the engine is restarted, turn the engine off immediately. |
 | Chassis Warning | If a fault condition is detected, the light will remain on as long as the condition exists. Retrieve the error codes for diagnosis. This lamp is also known as an Amber Warning Lamp (AWL). |
 | Transmission Control Module (TCM) Fault Warning | If a fault condition is detected, the light will remain on as long as the condition exists. Retrieve the error codes for diagnosis. |
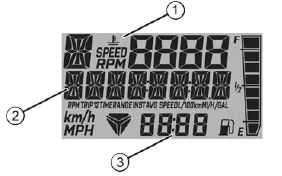
Rider Information Center
The rider information center is located in the instrument cluster. All segments will light up for one second at start-up.
The fuel gauge shows the level of fuel in the fuel tank. When the last segment clears, a low fuel warning is activated. The outline of the fuel display will flash. Refuel immediately.
If the instrument cluster fails to illuminate, a battery over-voltage may have occurred and the instrument cluster may have shut off to protect the electronic speedometer. If this occurs, your Slingshot Dealer or other qualified person can provide proper diagnosis.
The rider information center contains three areas that display mode information.
| Area 1 Modes | Description |
| Engine Temperature | Temperature of engine coolant |
| Vehicle Speed | Speed of vehicle |
| Tachometer | Engine speed (RPM) |
| Air Temperature | Temperature of ambient air around vehicle |
| Area 2 Modes | Description |
| Tachometer | Engine speed (RPM) |
| Vehicle Speed | Speed of vehicle |
| Odometer | Records and displays the distance traveled by the vehicle |
| Trip Meters (T1/T2) | Records the distance traveled by the vehicle if reset before each trip. |
| Fuel Range | Approximated vehicle range (in miles/km) based on remaining fuel |
| Average Fuel Economy | Average fuel economy in mpg or km/l |
| Instant Fuel Economy | Instant fuel economy in mpg or km/l |
| Trip Time | Time length of vehicle operation since mode was last reset |
| Voltmeter | Displays the vehicle's electric output |
| Engine Temperature | Temperature of engine coolant |
| Ambient Temperature | Temperature outside of the vehicle |
| Area 3 Modes | Description |
| Clock | The lock displays time in a 12-hour or 24-hour format. |
Gauge Settings Menu
Press and release the mode button to cycle through the Area 1 modes until the desired default mode displays.
Press and hold the mode button to enter the settings menu. The options screen will display for a few seconds.
1. Press and release either toggle button to cycle to the desired option.
2. Press MODE to select the option.
3. Press either toggle button to cycle to the desired setting.
4. Press MODE to save and exit to the settings menu.
5. Press and hold the MODE button to exit the settings menu.
Backlight Color
The information center backlight can be set to either blue or red.
1. Press and hold the MODE button to enter the settings menu.
2. Press either toggle button to cycle to the "BL COLOR" option. Press MODE to select.
3. Press either toggle button to cycle to the desired setting.
4. Press MODE to save and exit to the settings menu.
Backlight Brightness
1. Press and hold the MODE button to enter the settings menu.
2. Press either toggle button to cycle to the "BL LEVEL" option. Press MODE to select.
3. Press the "UP" button to increase brightness. Press the "DOWN" button to decrease brightness.
4. Press MODE to select and exit to the settings menu.
Trip Meter
Use a trip meter to track the distance traveled during a specific trip or period of time. Reset the meter to zero before traveling.
1. Press either toggle button to cycle to the desired trip meter option (T1 or T2).
2. Press and hold either toggle button until the meter resets to zero.
Error Codes
The error screen displays only when the MIL, AWL, EPS or ABS lamp is on or when it goes on and off during one ignition cycle. Error codes are not stored. When the key is turned OFF, the code and message are lost, but will reappear if the fault reoccurs after restarting the engine.
If an error lamp illuminates, retrieve the active error codes from the display.
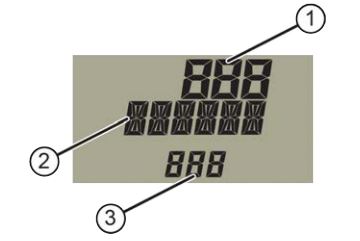
(1) Failure Mode Indicator (FMI)
(2) Suspect Parameter Number (SPN)
(3) Code Count
1. Press and hold the mode button to enter the settings menu.
2. Press either toggle button to cycle to the "DIAGCODE" option. Press the mode button to select.
3. More than one diagnostic code may be present. Press the toggle UP button to see if more codes are present. Press the mode button to select a code. Note: If the displayed code is an engine fault code, the CHECK ENGINE lamp will blink. If the displayed code is an EPS fault code, the EPS lamp will blink.
4. Record the three numbers displayed.
5. Press the mode button to exit to the settings menu.
For more information, see your authorized Slingshot Dealer. Find a dealer near you with the Dealer Locator.
Maintenance tips, procedures and specifications can be found in your Owner's Manual.
To find diagrams and replacement part numbers, use the online parts catalog.
Unless noted, trademarks are the property of Polaris Industries Inc.
© 2022 Polaris Inc.


